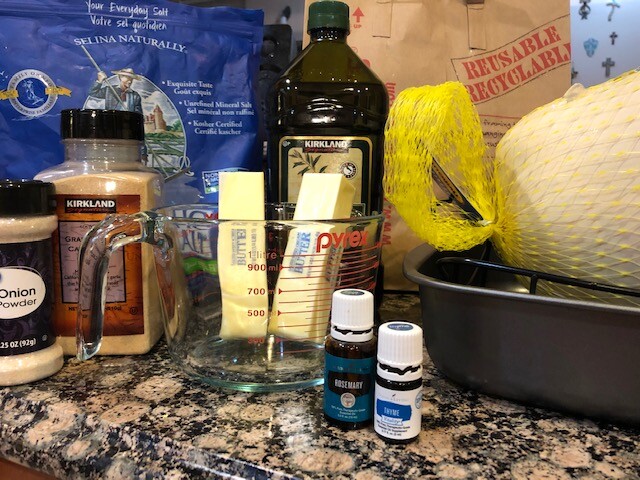
Thanksgiving is JUST around the corner, with Christmas not far behind! Many times I've shared our turkey preparation method, which we first tried in 2016 after seeing my friend Shauna's video detailing the process. It sounded so easy and...dare I say...failproof! We tried it, and even the family members who really preferred ham were raving. It has been our go-to ever since.
Because I find myself sharing the method (because it really is more of a process than a recipe) over and over, I figured it was time to put it in writing! All credit to my friend Shauna for introducing us to this way of turkey preparation that has taken so much of the stress out of meal planning for a special holiday! The bird is done in just 3 hours no matter how large or small it is, so no more kitchen math!
You will need:
- A turkey, of course! Any size works with this method--you don't change a single thing!
- A brown paper bag (the only ones in our house currently are from Trader Joe's)
- A roasting pan
- Olive oil
- 2 sticks of butter
- About 3 tablespoons each of onion powder, garlic powder, and salt (we use Celtic sea salt for the health benefits; you can get a 1-pound bag for a reasonable price, or, for a better bang for your buck AND enough salt to last a normal-sized family a year, a 5-pound bag).
- Black pepper if desired (we usually omit it or just do a few sprinkles)
- Fresh thyme and/or rosemary (we use Young Living's vitality essential oils, just 1-2 drops each, or maybe 3-4 for a large turkey; if you don't have access to these amazing oils, contact me!)
- One onion, quartered, for the inside of the turkey (oops, forgot to add that in for the picture, lol)
Instructions:
- Mix salt, pepper, onion powder, garlic powder, thyme, and rosemary with softened (but not melted) butter.
- Prepare the paper bag by pouring some olive oil in it: let it run down the sides and swish it around so that it's reasonably covered (not saturated). Place the bag in the roasting pan, ready to receive the turkey after you finish with it.
- After washing the turkey and patting dry, loosen the skin all over it. (Roll up your sleeves because this is a very interactive activity, lol.)
- Then, slather that butter mixture allllllll over the bird, on the outside as well as under the skin. Yes, it's messy. Yes, we are basically frying our turkey in butter. YES, it is the most DELICIOUS bird you'll ever eat!
- Put the onion quarters inside the turkey...you can do your stuffing if you like. Our family doesn't particularly care to stuff the turkey, so we don't do this, and truthfully, we've skipped the onion at times too and it still tastes amazing.
- Now slide the bird into the paper bag, which should already be in your roasting pan. (You can put it breast down if you like. We've done both and it turns out well either way, though breast down does keep the white meat juicier.)
- WASH YOUR HANDS! AND WASH YOUR ARMS! (Don't ask me how we now know to make sure errrrrrrything gets sanitized...) Wash the sink and any surface the bird touched! (We love our Thieves Household Cleaner for its efficacy and lack of harsh, harmful chemicals...again, if you don't have access to this, contact me!)
- Now that your hands are clean, fold up the open end of the paper bag and staple it shut.
- Now for oven entry...the oven should be COLD. We do not preheat!
- Place the roasting pan into the cold oven, making sure the paper bag is not touching anything!!
- Close the oven door. Set the temperature to 500 degrees and cook for one hour.
- Turn the temp to 400 degrees. Cook for another hour.
- Turn the temp to 300 degrees. Cook for one more hour.
- Your turkey is FINISHED!
When the turkey is finished, you will have some wonderful juices for your gravy. We have prepared our turkey the day of as well as the day before our special meal, depending on our other food plans and oven needs.
I hope this is helpful and maybe even inspiring! Leave a comment and let us know if you try it!
If you'd like to see a video, my lovely friend Shauna gave me permission to share this peek into her kitchen which is what inspired us in the first place!
*This post contains affiliate links. :-)
Love what you're reading? Subscribe here for updates!









0 Comments